

How to Build 4K Gaming PC for under $1500 (Guide)
This is 2017 and most of the people are upgrading to 4K devices. Particularly in gaming, where the graphics cards that are available these days are capable of treatment games in 4K resolution. Nosotros have tons of 4K monitors and TVs to experience this level of detail in all its celebrity. Turn a couple of years back and you had to buy a computer worth thousands of dollars to play a game in 4K resolution. Just now, the prices have come downward and 4K gaming systems are finally affordable for well-nigh of u.s.. So, if you're in the market looking forward to upgrade to a high-cease gaming PC to play games at 4K resolution on a upkeep, we've got yous covered. It's not that expensive either. Today nosotros're going to let you know what components you lot should go for and where to go them from, so that you lot'll know how to build a 4K gaming PC for under $1500:
The Components for a 4K Gaming PC
We're going to discuss each of the components that you lot'll need to build the PC separately, in social club to avoid whatever confusion. You can go all of these components on Amazon and the links to purchase it have been provided nether each of these components. And then, let'southward accept a wait at all the components required.
Note: This $1500 build will include all the components that you'll need to power 4K displays. The cost of the 4K monitor is non included in the price of the build and you'll have to purchase it based on your personal needs, because even the least expensive ones cost above $300. Come on! Yous cannot build a similar spec'd rig with a monitor for nether $1500 at this betoken of time. If you are llooking for a 4K monitor, y'all can check out our listing of the best gaming monitors you tin buy.
1. Processor
As this component is basically the most important part of your estimator that decides the overall performance, we will not be sacrificing operation only to bring down the cost. As far as this build is concerned, we will be going with Intel's latest Kaby Lake i7-7700K desktop processor which has base clock of 4.ii GHz and heave clock of up to 4.5 GHz. It'southward the processor which is widely preferred by people for their gaming needs. The i7-7700k is an unlocked processor, which means you lot will be able to easily overclock information technology if you need more performance than it already has. It currently costs $329 on Amazon and prices may slightly vary any time.
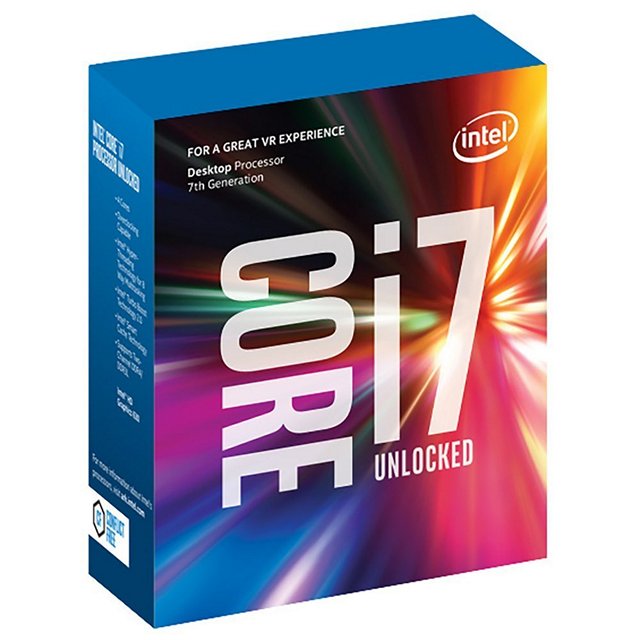
Purchase from Amazon: ($329.99)
two. Graphics Card
The GPU that your PC runs on, completely determines the gaming functioning that you're going to become. We aren't gonna make any compromises here and we will be going for NVIDIA's superlative-tier Pascal card, the GTX 1080 which was released back in May 2016. This graphics card can handle 4K and VR on almost all of the games with accented ease. There are several variants of the GTX 1080 made by different manufacturers similar Asus, Zotac, MSI, Gigabyte and EVGA, but we will be going with the Gigabyte GTX 1080 G1 Gaming graphics card which has a triple fan set upward which is essential to continue the temperatures down, considering you're living in a hot country similar India. If you want a slight heave in performance, you tin hands overclock information technology with MSI Afterburner software as well.
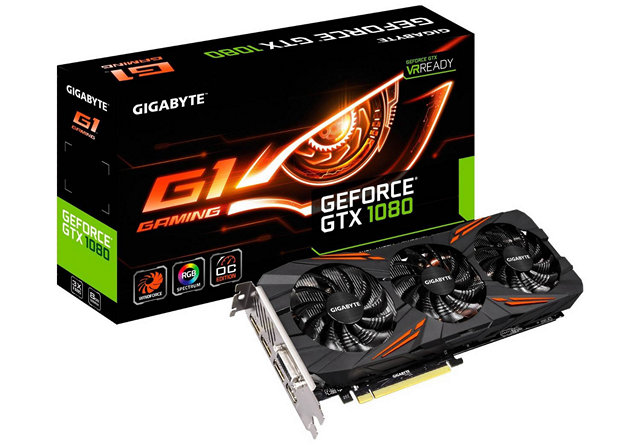
Purchase from Amazon: ($502)
three. RAM
Most of the latest games available at the moment, require a minimum of 8GB RAM, fifty-fifty though 16GB is recommended to get the all-time performance. So, for RAM, we'll be going for the Corsair Vengeance 16GB DDR4 RAM in dual-channel with a frequency of 3000MHz. This is usually the RAM which PC enthusiasts adopt and information technology'south quite popular amidst gamers.
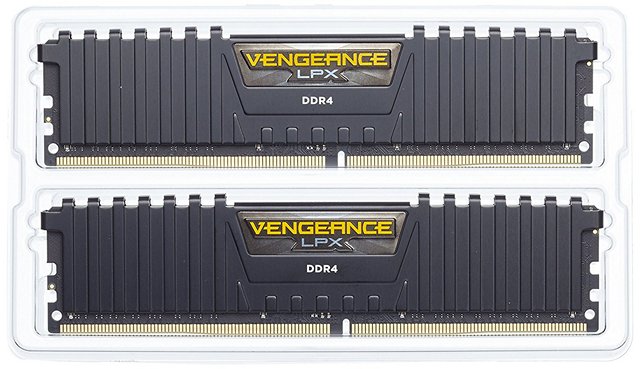
Buy from Amazon: ($119.99)
4. Example
At that place are plenty of PC Cases to cull from. Nowadays, at that place are several cases made out of tempered glass with RGB lighting built-in. However, we decided to become for the Corsair Carbide Series SPEC-Blastoff Mid-Tower case, as we'd similar to cut downward some costs and relieve some money in this section. Looks aren't everything. We are aiming for functioning on a upkeep. That being said, this case volition nonetheless manage to plow heads, considering of its unique angular design. It costs simply under $fourscore and coming from a well known make like Corsair, this case won't leave y'all disappointed.
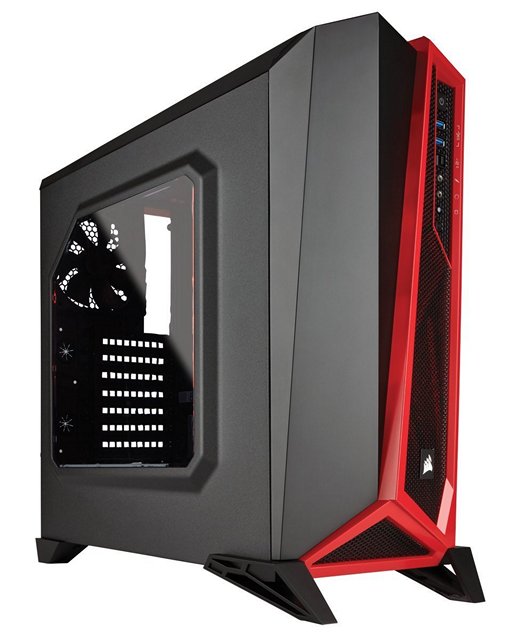
Purchase from Amazon: ($79.99)
v. Motherboard
This will be the start component that yous will be installing inside your Corsair SPEC-ALPHA case and this volition house and connect to all of the components of your estimator. Considering your having an unlocked i7-7700K processor which is capable of overclocking, nosotros decided to go for a motherboard that will easily allow overclocking too. Nosotros'll be using the MSI Z170A Gaming M5 motherboard for this build, as it'southward non expensive and provides almost all the features that you'll need for this build. It'south priced at just under $130 on Amazon.
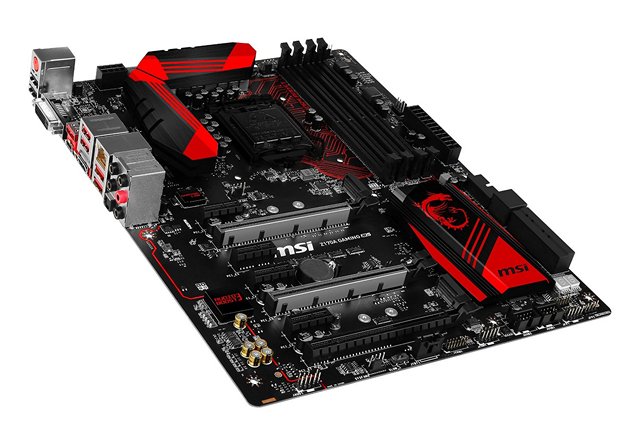
Buy from Amazon: ($129.99)
half dozen. Ability Supply Unit
Do not underestimate the importance of a Power Supply Unit (PSU). It's equally important as all the other components mentioned higher up. The PSU powers upward your entire system and without this, your PC is incomplete. We've decided the PSU that we're going to use in this build based on three things – Power output, Efficiency and Manufacturer. EVGA is a well known manufacturer and their customer back up is impressive. That's not the only reason why we chose EVGA 600 B1 PSU for this build. It's eighty PLUS statuary certified and has 85% efficiency which is quite important in a gaming rig. For this build, we chose the 600 watt PSU to give you some overclocking headroom, but in case you decided to overclock your CPU and GPU for some operation boost. We could've gone for a fully modular PSU to get better cable management for a higher price, but like I said, we're on a budget and we're going for performance, not the looks.
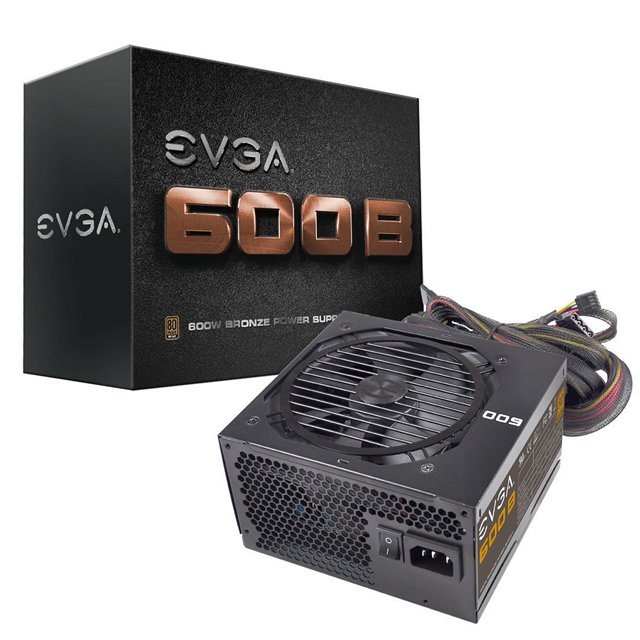
Buy from Amazon: ($49.99)
7. Storage
We're living in 2017, so don't imagine building a PC without an SSD. Nosotros"ll be using two storage drives in our build. One will be an SSD that will exist our principal boot drive, to speed up your Windows. Other will be a traditional HDD that will satisfy all your space requirements. You lot can install some important applications that you frequency use on your SSD equally well, in order to speed up their load times. As far as SSD is concerned, nosotros'll be going for a Sandisk SSD PLUS 120GB SATA solid state hard drive. Sad, if you were thinking that we were gonna add an NVMe or M.two SSD, as that won't fit our budget. Nosotros decided to choose Western Digital'southward one TB Caviar Blue SATA half dozen Gb/s 7200 RPM HDD which is pretty much loved by almost everyone on Amazon.

Buy from Amazon: SSD ($49.99) and HDD ($49.99)
viii. CPU Cooler
Yous have an i7-7700K processor in this build, which y'all'll probably be overclocking. The stock libation that comes with the CPU has e'er been considered as trash. At stock speeds, the temperature of the CPU is still high while using a stock cooler. And so, keeping that in listen, we've decided to go for an aftermarket CPU cooler that can keep your temperatures low and also provide you with some modest headroom for overclocking, if you plan to exercise so. We chose the Libation Master Hyper 212 EVO to practice that job. This is widely considered to be 1 of the best CPU coolers yous can purchase on a budget and at a price of under $30, I'd say the Hyper 212 EVO is a steal.
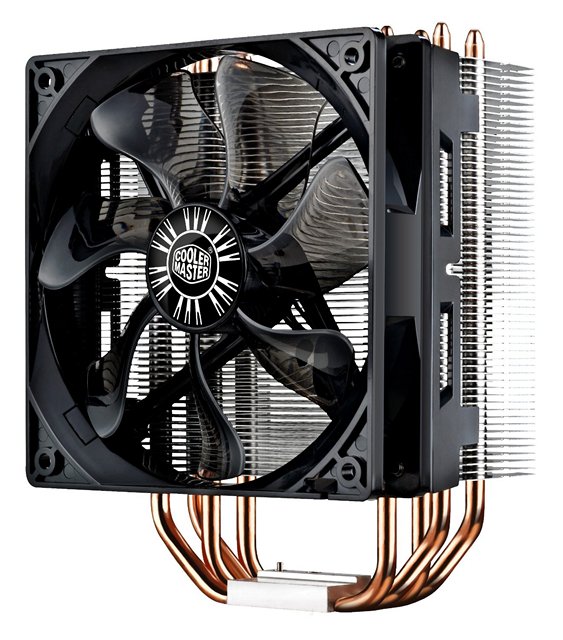
Buy from Amazon: ($29.99)
9. Keyboard & Mouse
This is the twelvemonth of RGB components, equally the craze for RGB is at it'south peak right at present. If you lot haven't read the news, there's even an RGB chair for gamers. Nosotros didn't desire to disappoint you in this regard. We wanted to choose an RGB Keyboard & Mouse combo for under $100 and judge what? We simply did it. We went for the Logitech's G213 Prodigy Gaming Keyboard with RGB lighting, but brand no fault, this is not a mechanical keyboard, it has condom dome switches in them. The keys have 4mm travel altitude and the keyboard as well has an armrest, so you wont exist disappointed on that front end.
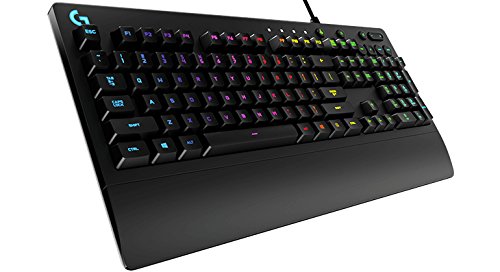
Purchase from Amazon: ($59.99)
Equally far as mouse is concerned, we decided to trust Logitech again and chose the G303 Daedalus Noon Performance Edition gaming mouse. Logitech makes some swell mice and that's exactly why nosotros chose them. The mouse comes with an on-the-fly DPI switcher letting you change your DPI from 200-12000 DPI with only a few clicks and also has glorious RGB customizable lighting for a toll of merely under $35. Quite a steal, correct?
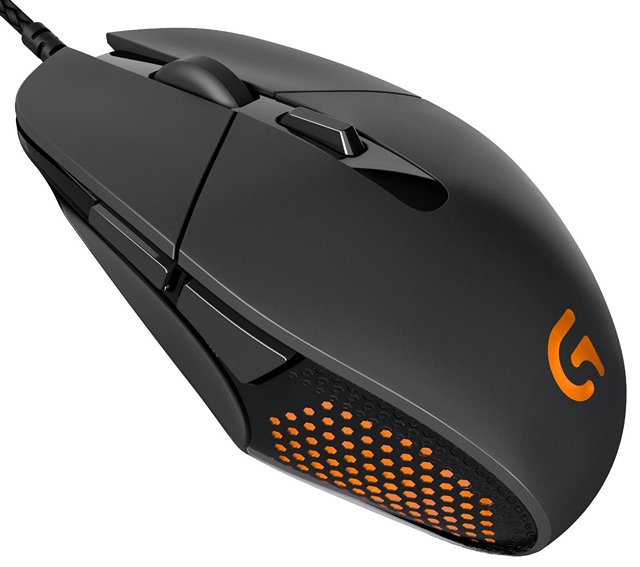
Buy from Amazon: ($34.99)
Installation of Components
Note: If you lot don't know what you're doing, we highly recommend y'all to get the help of an skillful technician to build your PC. Nosotros volition non be responsible for any impairment that you lot may cause to your system during this procedure.
We're not going to give yous a detailed step-by-pace guide regarding the edifice process. Instead, nosotros'll exist giving y'all just a brief overview on how to go all these components together into a unmarried unit, so that yous can keep to install the operating organization after.
Setting Upwardly Motherboard
We don't recommend mounting the motherboard inside the case before installing the processor, CPU cooler and RAM sticks, every bit doing information technology separately on the outside gives yous more than room to work with.
- Firstly, you demand to mount the CPU in the motherboard. You can do this by pulling the lever on the CPU socket backwards to elevator it up. Now place it in the socket and close the lever to secure the processor in place. Make sure your CPU is in the correct orientation by adjustment the tiny arrow at the bottom left hand corner of your processor with the one on the motherboard.
- Secondly, you need to insert the RAM sticks in 2 of the four slots correct side by side your CPU socket. For a dual-channel set upward, insert both of your RAM sticks in either the first and third slots or the second and 4th slots.
- Finally, mount the CPU cooler on to the top of your CPU socket using the mounting bracket and screws provided along with the cooler. Attached to the Hyper 212 Evo is a power cable which you can employ to connect to the CPU fan header which is located on the motherboard, right above the cooler. Brand certain y'all read the instructions booklet inside the box to avoid making whatsoever mistakes.
- Earlier y'all proceed to mount the motherboard inside your case, make sure you install the I/O shield that was provided with your motherboard to the rear of the PC's instance. It will easily snap correct into identify, if y'all're doing information technology correctly.
Mounting The Rest Of The Components
Once yous've mounted and lined upwards your motherboard with the I/O shield on your instance, information technology'south time to get the rest of the components inside your case also. But before that, your Corsair Carbide SPEC-ALPHA case has pre-installed fans with cables hanging inside. Connect them to the fan headers on your motherboard for power. There are also cables within your instance that connect to the forepart I/O ports. You will take to connect these cables to the connectors located at the bottom of your motherboard in lodge to get those ports to work. Now, lets proceed to mount the other components.
- Firstly, let's mountain your SSD and HDD. The Western Digital HDD tin be mounted inside the difficult drive cage and the Sandisk SSD tin be mounted on one of the 2.5 inch slots located to a higher place the difficult drive muzzle. Connect the SSD and HDD to your motherboard with the SATA cables that came with your motherboard.
- Secondly, mountain your GTX 1080 graphics card on the motherboard. To exercise this, you demand to remove the top ii PCIe slots located on the back of your example using a screwdriver. Now, you can easily install your graphics carte du jour on the top PCIe slot located right below your CPU libation. The process is quite like to how yous installed the RAM. The graphics bill of fare should snap correct into place if yous're doing it correctly. Now, only screw it dorsum in to secure the menu in place.
- Finally, we've reached the last footstep of the building process. Mount the Power Supply Unit (PSU) to the bottom of the case. Your EVGA 600 B1 PSU comes with a lot of power connectors. Connect the 20+4 pivot connector to the header located on the right side of your motherboard. This will be used by the motherboard mainly to draw power. In social club to supply power to your graphics card, connect the 8-pin power cablevision from the your PSU. At present, you demand to supply power to your CPU past using an 8 pivot cable to connect to the header located at the top right of the motherboard. At last, you need to use the SATA power cables on your PSU to connect information technology to the SSD and HDD and then that it can draw power.
Great, we're most done here. Connect your keyboard and mouse to the USB ports on the rear of your case. Also, connect the monitor to the graphics card using a DVI, HDMI or DisplayPort. At present, utilize the ability adapter that came with your Power Supply Unit of measurement to plug it into the wall. Turn it on and see if yous boot right into the Motherboard BIOS, so that yous can install Windows. If you managed to reach this far, then you did a good task. If non, you probably messed something up and you'll need assistance from good immediately.
Run across ALSO: Intel Core i9 vs AMD Ryzen Threadripper: Quick Comparison
Ready to Build Your Very Own 4K Gaming PC?
We're glad to let yous guys know that you can, in fact build yourself a 4K PC for under $1500. We could've fabricated it cheaper, but nosotros did not want any kind of bottlenecks on the organization by using low quality components. The entire build, including all the components mentioned in a higher place, amounts to approximately $1480,as of this writing. Go on in mind, that pricing will slightly vary at times. If you still have some cash in hand after building this PC, maybe you lot can spend it on a gaming headset, RGB mouse pad, or even a speaker system.
And then, are you finally set to make the spring to 4K this yr for the sake of PC Main Race? If so, let united states know by dropping a annotate below. As well, if you'd like to see more builds in the future, make sure your views reach us in the comments section.

Source: https://beebom.com/how-build-4k-gaming-pc-1500/
Posted by: nunnbuls1960.blogspot.com
0 Response to "How to Build 4K Gaming PC for under $1500 (Guide)"
Post a Comment